The Teton Optimization Kit provides an assessment of sample quality, cell growth, and morphology - allowing customers to optimize cell culture techniques and experimental variables. This training will walk through the necessary techniques for seeding cells, adding liquid, and removing liquid when working with cells in the Teton Slide Kit.
To complete the Teton Optimization Workflow with suspension cells, you will first centrifuge the cells to allow them to adhere onto the glass slide. Subsequently, you'll fix with 8% formaldehyde. The cells will then be labeled with the Teton Optimization Reagents and visualized on a fluorescent microscope.
Element Kits required for Teton Optimization
Teton Optimization Kit (860-00022)
The Teton Optimization Kit contains Teton Optimization Reagents and the Teton Flow Cell Assembly Kit - enough for 2 optimizations
The Teton Flow Cell Assembly Kit provides an adhesive glass slide to facilitate imaging on the microscope.
Teton Slide Kit, 12-well
We have options for slides pre-coated with poly-L-lysine (PLL), or uncoated slides to be used with a custom coating. Each slide kit contains 2 slides:
- Teton Slide Kit, PLL - 12-well (860-00031)
- Teton Slide Kit, Uncoated - 12-well (860-00032)
Sample preparation and fixation overview
For both the Teton Optimization workflow and a Teton CytoProfiling run, the cell culture techniques are the same. Customers will prepare a custom surface, if necessary, seed, and then fix the slides. Click through for a walkthrough of Sample Preparation and Fixation.
Detailed instructions can be found in the Teton CytoProfiling User Guide.
Step 1: [Optional] Custom coat the glass slide
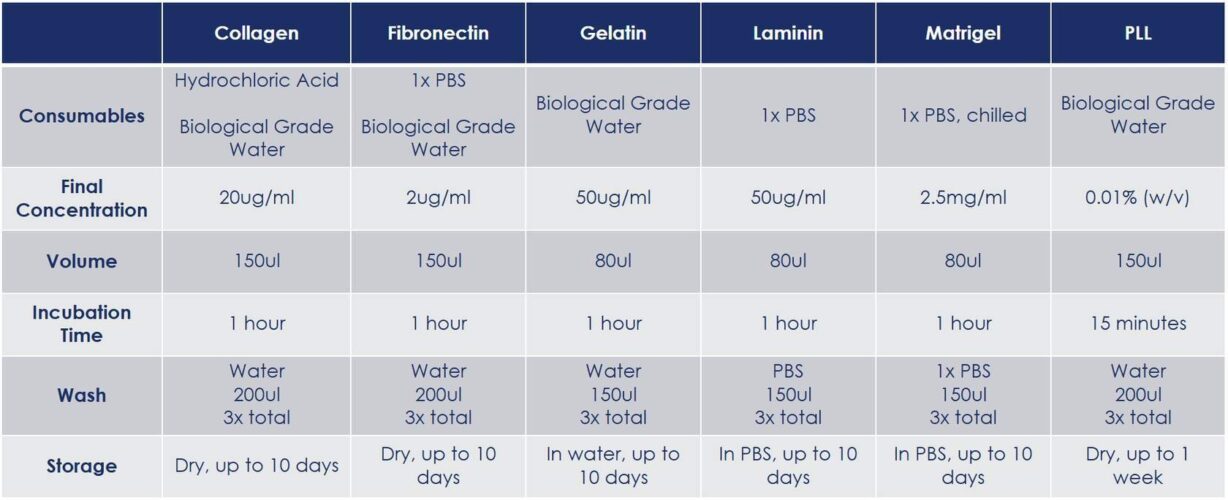
If you have pre-coated PLL slides, you can proceed to the next step.
If you have uncoated slides, first treat the slides with freshly prepared 0.1N NaOH then wash 5x with biological grade water. After the slides have been prepared, refer to the table above to see the coating options.
Step 2: Prepare cells
Cells should be actively growing in culture and exhibit high viability. Once you are ready to prepare your slide, collect, and spin down your cells. Ensure cells are fully dissociated to a single cell suspension to reduce clumping on the slides.
Count cells and resuspend in PBS so that you meet your target seeding number in 150 µL. For example, Element Biosciences uses 400,000- 600,000 cells per mL for Jurkat cells.
Step 3: Seed cells onto the slide
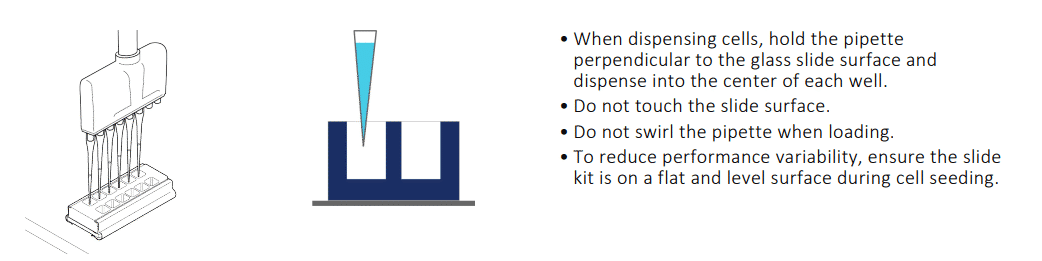
Proper pipetting techniques are critical to ensure an even monolayer of cells. Videos are provided in the next section to further highlight these techniques.
When seeding suspension cells, hold the pipette perpendicular to the slide and ensure that the pipette is not touching the glass slide. Gently dispense the cells into the well using a multichannel pipette.
When seeding cells, dispense liquid only once into the slide kit. For example, if doing a series of dilutions, prepare the dilutions in a 96-well plate. Avoid adding cells and then topping off with additional media.
Step 4: Distribute cells using a rocking motion
Gently distribute the cells using a forward-and-back, then side-to-side motion.
Do not move in a circular motion.
Customers may find it easier to place the slide in a 10 cm dish. At a slow pace, move the slide in a North-South motion ensuring the slide moves ~5 inches (12.5 cm) in each direction. Pause and then move the slide in the East-West direction.
When moving to the incubator, make sure to not disturb the cells or introduce rotational movement. Repeat the motion in the incubator as well to ensure cells remain properly distributed.
Step 5: Centrifuge cells to attach
Cover the wells with the slide kit lid and add to the assembly holder. Balance in a centrifuge with another assembly holder and spin for 15 minutes at 300 x g.
Step 6: Fix suspension cells
Fix the cells by adding 8% formaldehyde to the centrifuged cells without removing the PBS. Incubate at room temperature for 20-30 minutes.
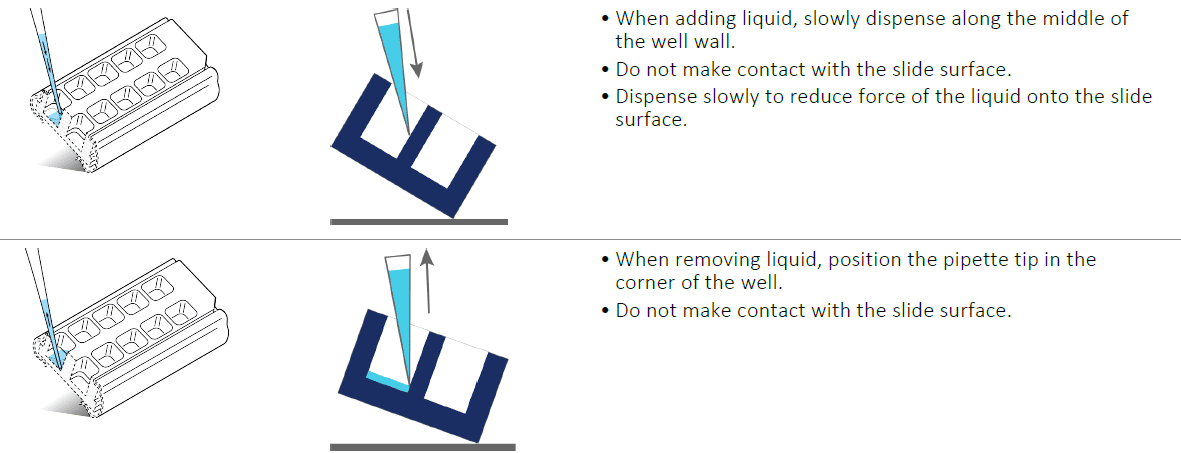
To disturb the cells as minimally as possible, we recommend the following techniques:
- When adding liquid, dispense slowly along the middle of the well wall. This allows the liquid to flow more gently across the cells.
- When removing liquid, tilt the slide and position the tip towards one corner. Leave a small amount of liquid behind, ~30-50 µL. Avoid making contact with the slide surface.
Once the cells are fixed, they may be stored in 1x PBS with RiboLock at 4°C for up to 30 days.
Summary
At this point you've successfully seeded and fixed your cells! Proceed to the next step to review videos for these pipetting techniques.
Seeding cells into the slide kit
Disperse cells using a rocking motion
Adding liquid after seeding
Removing liquid after cells have adhered
Prepare the slide kit with optimization kit reagents
Follow the steps below when you are ready to proceed with the optimization kit.
Label with Optimization Reagents
- Thaw the optimization reagents in a room temperature water bath for 15-20 minutes.
- Wash the fixed cells 2x with 1x PBS.
- Add the Teton Optimization Kit Reagent, incubate for 1 minute (do not exceed 2 minutes).
- Completely remove the Teton Optimization Reagent and then wash with the Teton Optimization Kit Wash Buffer.
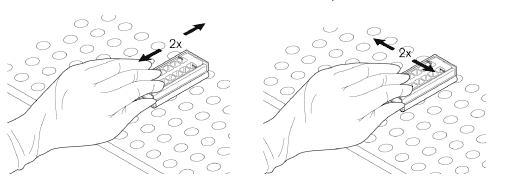
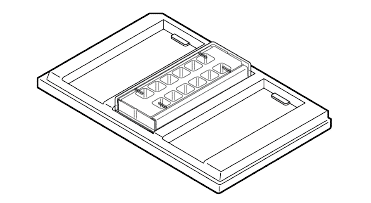
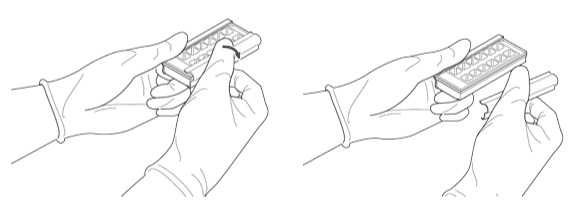
Disassemble the Slide Kit
- Use a vacuum aspiration system with 200 µL tips to remove all liquid in the wells.
- Turn the slide kit upside down so the open wells are facing downward, and the glass slide is facing upward.
- Hold the slide kit with both hands on the long edges, place your thumb on the top-center location of one of the metal clips. Quickly rotate the top edge of the side clip outward to release.
- Repeat for the other clip.
- You can manually assemble* the slide by aligning the adhesive slide from the Flow Cell Assembly Kit with the dried cell slide OR use the Teton Assembly Tool Set.
*Manual assembly of the slide is only compatible with the Teton Optimization Kit. When performing a Teton run, you must use the Teton Assembly Tool Set.
Visualize on a microscope
To visualize the cell membrane and nuclei compartments, you'll need a microscope with the following specifications:
- Green Filter: 515-560 nm excitation, 580-650 nm emission (similar to Cy3 filter) for cell membrane
- Red Filter: 620-650 nm excitation, 660-750 nm emission (similar to Cy5) for cell nucleus
Ensure the objective is able to image through 1mm thick glass.
Assessing the Teton Optimization Slide
When visualizing on the microscope, consider the following questions:
- Do the cells look the way you would expect in normal culturing conditions? Look at the cell shape and how intact the cell membrane / nucleus is.
- Is the cell distribution uniform or does it have areas of clearing, clumping, or 3D growth? This may indicate a need to optimize culture/washing/fixing methods.
- Does your cell count and well confluency match what you expect given your seeding density and growth rates? We recommend targeting 50-70% confluency.
- How saturated are the stains/dyes?
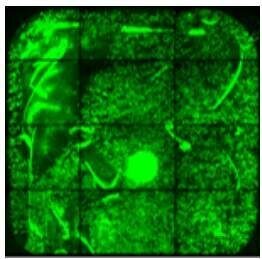
Phenotypes to avoid
To ensure best results, practice pipetting techniques such as slow pipetting and proper dispersion as described in the videos. Click through the cards below to see examples of poor seeding and the best ways to avoid them.
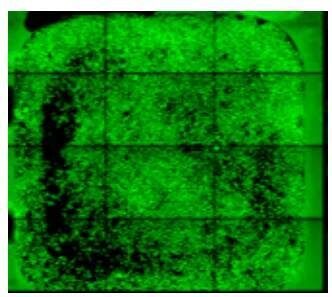 | To avoid the ring pattern that you see here, avoid circular movement of the pipette or slide kit. Use a side-to-side movement for uniform cell distribution. |
 | To avoid cell loss in the corner of the well, pipette slowly to prevent bubbles when dispensing cells. Avoid pipette tip contact with the surface of the slide. |
 | Cell loss in the middle of the well can be caused by liquid impact - pipette slowly and against the well wall. |
 | Avoid pipette tip contact with the surface of the slide to avoid scratch marks on the surface. |
 | Pipette tip contact with the surface of the slide can lead to cell loss in random locations. |
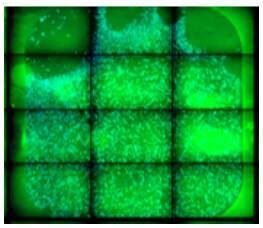
Successful Preparation
Below is an example well of a successful preparation. Please note:
- Even distribution of cells across the well
- Monolayer distribution without cell clumping
- Confluency of 50-70%
- Absence of nicks or scratches
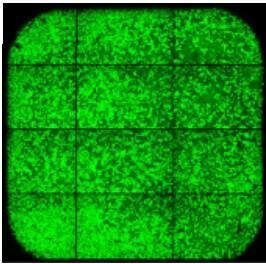 | Successful preparation! |
For more information on Teton workflows, see the following resources: